the following steps below.
Trim-A-Gutter™ Making & Installing Gutter-Cover
|
|
|
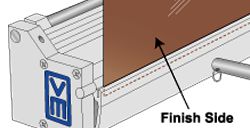
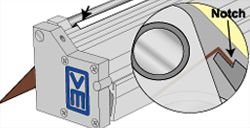
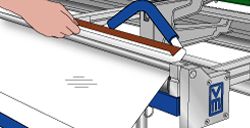
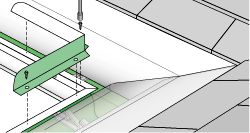
| 1. Cut a blank up to 50 inches long and to the desired width. Insert edge fully into slot with finish side (side exposed to weather), facing as shown. Bend upward 90 degrees to create a 1/2" flange. | 2. With finish side of material facing downward, slide flat end between roller and anvil until the 1/2" flange is fully seated in notch. Note: The 1/2" flange must be exact to work properly with brackets. | 3. Lift roller handle to a complete stop to form the radius. Note: When forming standard trim-coil, use of the reinforcement clip (step 4), is unnecessary. |
|
|
|
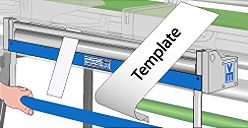
| 4. For gutter-coil, insert blank per Step 2 above and slide reinforcement clip in place. Lift roller handle to form radius without allowing blank to touch or hit the clip which can cause damage to material. | 5. Return roller to the starting position and remove reinforcement clip if in use. Rotate blank and slide from tool. Note: Practice with smaller lengths until satisfied with results. | 6. Cut a 3” or 4” strip and perform steps 1, 2 and 3 above. This will become your template to use throughout the job and will be further explained in the following steps below. |
Trim-A-Gutter™ Existing Gutter Installation
Pre-Installation Note: Most trim/gutter coil comes from the factory with a glossy, or shiny finish which can cause rain to overshoot the gutter opening (similar to water running off a waxed car). This is a common occurrence in the gutter/leaf protection industry and should be discussed with the property owner. Normally, the gutter-cover loses it’s shiny finish after a short time of exposure to the elements with the water then wrapping around the gutter-cover and falling into the gutter trough the way it’s supposed to. One solution, for those who don’t want to wait for Mother Nature to do her thing, is to remove the shiny finish on the gutter-cover surface by lightly wiping it with a *Scotch-Brite® type pad so it dulls the surface slightly. This should allow the water to properly adhere to the gutter-cover until it is deposited into the gutter trough.
*Scotch-Brite® is a registered trademark of the 3M corporation.
Installing Trim-A-Gutter™ Cover over existing gutter systems
The following instructions are to be used as a guideline on getting up and running with Trim-A-Gutter™ Tools and Hardware. Before getting started, it is recommended that you check the entire gutter system for problems, such as clogged downspouts, leaks or rotted wood, before installing gutter-cover. Check end caps, outlets and seams for water-tightness. Keep in mind Trim-A-Gutter™ gutter-cover will not make the gutter system waterproof, only leaf resistant.
 |
 |
 |
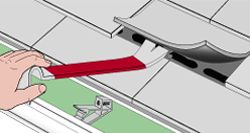
1. Clear all leaves and debris from gutter and downspouts. Check entire gutter system for loose spikes/seams and miters. Other problem areas, such as improperly installed gutters and downspouts should be corrected before installation. |
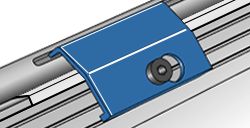
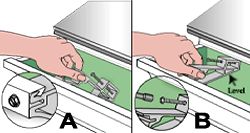
2. Pre install anchor into bracket. From the end-cap, lower back into gutter and insert front into gutter channel until hook catches lip (Detail A). Next, lift bracket until bottom is level. Hold firmly in place and drive anchor into fascia (Detail B). Note: If loose or no lip exist in channel, install 3/8 ”stainless screw thru channel and into slot (Detail A). |
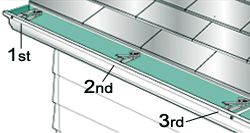
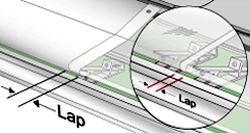
3. Install second bracket approx. 24 inches from 1st. Install 3rd bracket 1/2 inch in from end of section. This bracket will also serve as the 1st for the next section of gutter-cover which will overlap the 1st. Note: For extreme conditions, such as rough weather, additional brackets can be installed. |
 |
 |
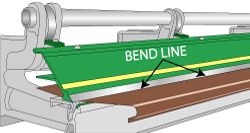 |
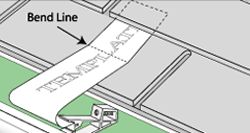
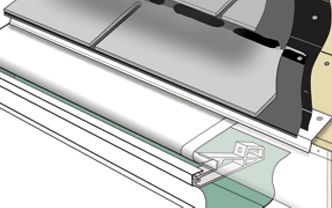
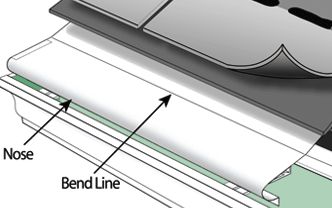
| 4. Carefully pinch up the tabs along the course of shingles the gutter-cover will be going under. To prevent puncturing/breaking the shingle tabs, work the pinch bar side to side as opposed to up and down. Note: Care should be given to older shingles which become brittle over time. | 5. Situate the template into bracket and onto roof area. Mark point in template where you want to match roof pitch (as shown), and make bend. The area below the bend line must maintain a slight pitch for positive drainage. | 6. Transfer bend line from template onto a blank. Next, place the blank into the brake aligning the bend line with the stainless edge. Bend upward until the blank matches the template to create the first section of gutter-cover. |
 |
 |
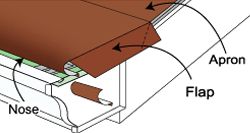 |
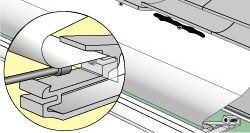
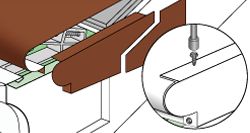
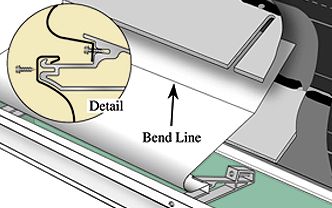
| 7. Tuck top of gutter-cover under loosened shingle tabs and fasten 1/2" flange into the first 2 brackets using 3/8" stainless screws (see Detail). Leave the 3rd bracket free until the next section of cover is lapped over. Carefully lift shingle tabs and nail top of apron to roof (generally 1 nail centered under each tab). Allow tabs to fall back in place ensuring no nailheads are exposed. | 8. Install two more brackets to receive next section of gutter-cover which is lapped over the 1st section to a point where both extend past either side of the bracket. Install the 3/8" stainless screw thru lap and into bracket. With your template, continue installing brackets and sections in this manner until complete. Note: Install gutter coil with a 1" lap between 2 brackets (see Detail). | End Caps. Option 1. Install gutter-cover 2-3 inches past end of gutter. Cut away the nose portion extending past the end cap. Trim the excess apron to edge of roof. Bend flap downward 90°, and trim along roof edge. |
 |
 |
 |
| Option 2. Click in circle to download and print template. Transfer dimensions onto material. Trim and bend piece to fit profile. Bend flange 90° and install a 3/8" self-drilling stainless screw at each end and bottom tab. |
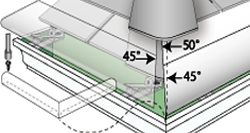
Miters. For hip roofs or returns, trim 1st section 50° and 2nd 45°. Butt the two sections along miter line. The extra 5° is used to conceal any gap between the miters and can be bent over to fit the contour of the ridge caps. Slide top edges under ridge cap. Once satisfied, fasten sections into brackets. Install splash guard* using 3/8" self-drilling stainless screws. Click splash guard to download template. | Valleys. Valley construction will vary from job to job. For typical installation, run 1st section past the miter line and trim the next piece even with the miter line. To prevent water run-off, add a splash guard* as shown using 3/8" self-drilling stainless screws. Click on splash guard to download template. |
Trim-A-Gutter™ New Gutter Installation
You should now have a basic understanding of how to install brackets and anchors, which you will use in these next few details. Two common installations for Trim-A-Gutter™ are the fascia mount and roof mount. What style you use will depend on preference and job dimensions. Use these details as a guide in making your determination. Note: It is the responsibility of the installer to ensure work conforms with building code and sound gutter/roof installation practices. It should also be pointed out the Trim-A-Gutter™ Tools and accessories are not intended to make the job waterproof, only leaf resistant.
 |
Fascia Mount |
 |
| 1. Hang gutters as you normally would using Trim-A-Gutter™ brackets & anchors. Design gutter-cover to terminate either at the top of fascia with a 90° flange (A) leaving room for drip edge, or (B), make bend 180° downward leading into gutter. Create a template of your profile as previously explained. Follow steps 2-8, as they apply, in the Existing Gutter Installation section. | 2. Next, install drip edge, underlayment and roofing per manufacturers instructions. Note regarding miters and end-caps: Due to the wide range of applications seen in residential gutters and roofing, it would be virtually impossible to outline detailed steps for making and installing them all here. We recommend using scrap to make practice bends until you are satisfied with your results. | |
 |
Roof Mount
|
 |
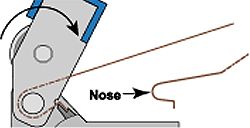
Low Profile. Install gutters using brackets & anchors. Create a template based on this profile remembering to keep a downward pitch from the bend line to the nose. Install drip edge and underlayment, then sections of gutter-cover based on your template. Install shingles even with bend line. Note: You may install cover under the 1st course of shingles provided the gutter is low enough to maintain the downward pitch from the bend line to the nose. |
Dome Profile. Install 1st course of shingles. Determine whether gutter-cover will go under the 2nd or 3rd course of shingles. Create a template of this profile and mark your bend line as previously described. With this particular design being more visible , match the gutter color as closely as possible for seamless integration. |