|
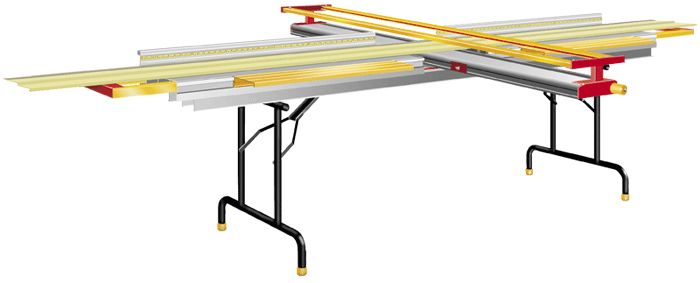
Installing Optional Steel Legs PN 3001
1. Screw down 4" x 5" center plate using 4 ea #10 sheet metal screws.
2. Screw down 2 pipe brackets using 4 ea #10 sheet metal screws.
3. Repeat leg installation on opposite end. Unfold legs and stand unit upright.
|
|
|
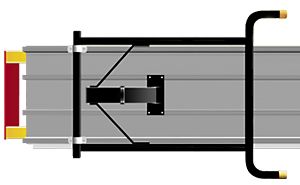
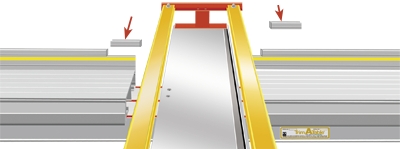
Install Rear Fence Lock Screws
1. Remove 5/16-18 hex nut, spring and 5/16-18 thumb-screw from top track of each rear fence. Slide rear fences outward until hole for thumbscrews are clear of table.
2. Center hex nut over hole in channel of rear fence as shown (right).
3. Insert thumbscrew through spring & hole and thread into hex nut. Move rear fences to desired position and tighten thumbscrews.
|
 |
|
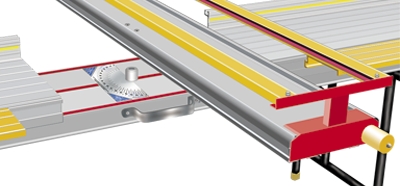
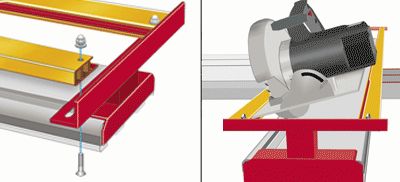
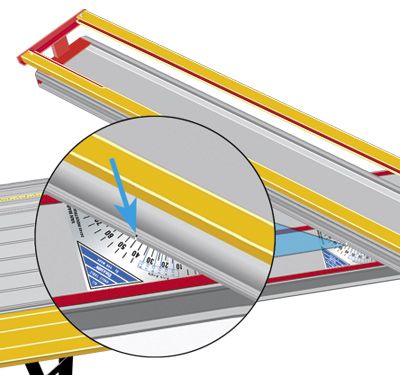
Saw Track Adjustment
1. Slide both top decks apart far enough to receive the saw boom. Align the pivot block opening on the underside of the boom with the pivot stub on the main deck. Lower the boom onto the pivot stub and rotate the locking knob clockwise until boom is firmly secured in place. To release or rotate the boom, loosen the locking knob counter clockwise and point the boom in direction of desired cut.
|
 |
|
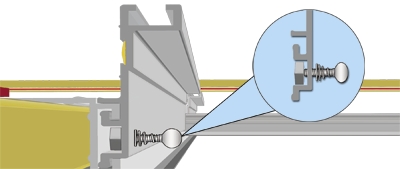
| 2. Loosen acorn nuts on saw track rails (do not remove). Insert saw shoe into track closest to the saw blade recess in base. Slide opposite track rail onto saw shoe. Move tracks and saw until saw blade is centered over recess. Snug acorn nuts and move saw along track to ensure free movement. If saw binds, loosen acorn nuts and readjust. You may want to use a square during this step to keep track rails square with rear fence. |
 |
|
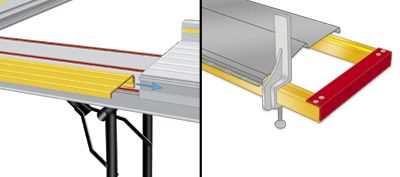
3. Trim-A-Table TAT60 was designed to accommodate most full-shoe circular saws on the market. For special situations you can remove or add 1/4 shims (PN 7033), to raise or lower the saw tracks to allow your saw blade into the recess. For best results, the teeth of the saw blade should break the plane of the saw track base slightly, but not cut into the bottom of the recess when moving the saw along the tracks during cut. Note: Adding shims must be done at both ends of base assembly and may require longer bolts which are
widely available at most hardware stores. |
 |
|
| 4. N ote: Complete this optional step only if tracks are lowered and additional support under rails is desired. First, notch out each rear fence to a point even with bottom of rails. Once you are ready to make cuts, position the saw boom at the desired angle and lock in place (see examples on page 3). Next, loosen each rear fence and position notches under each saw track (to help prevent saw tracks from sagging). Remember to loosen rear fences and slide out of the way before repositioning saw boom. |
 |
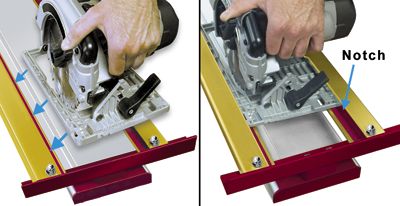
| Using Quick-In/Out Feature and Setting Saw Blade Depth |
| Now that your saw freely slides the length of the tracks, you can quickly remove or insert it by following the following procedure: While holding the saw at a slight angle, slide the edge of the saw shoe into the opening of the track and let the opposite edge of the shoe fall into place through the notch. Using the saw's height adjustment feature, raise or lower the blade to a point where it breaks the plane of the boom's base by at least an 1/8 inch (review on page 1) . |
 |
| Wing Supports, Memory Stops and Butt Stop Use |
| To install the wing supports, slide top decks away from saw boom. Align the male tracking nub with the female opening in the top deck and slide into place. After locking your saw boom to an angle, slide the wing under any material that may overhang the top decks. Butt stops can be used along the rear fences or extension rails to provide a convenient means for placing materials at a fixed point for repeat cuts. Memory stops can be tightened, or loosened on your mark along the saw boom and stop the boom at that point for repeat cutting. |
 |
| Operation & Tips |
| Top decks, rear fences and extensions can all be locked in place using the spring-loaded lock screws. Wings are designed to be free floating. To start cutting angles, slide tops away from center and rotate saw boom until the mark on the base is at the desired angle on the protractor. Turn locking knob clockwise until saw boom is firmly in place. Slide top decks back toward center to take up any gaps and lock in place. Slide material along the rear fence up to the desired cut. Make cut along entire cut line remembering to observe all manufacturers safety warnings and pre-cautions while operating any, and all related power tools.When cutting wide materials extending beyond the support offered by the wings, remove the rear fences. If a special angle is needed, create a template from scrap and draw the angle. Use this to set your saw boom. Periodically check the alignment of your saw boom assembly and re-tighten all fasteners as needed. Memory stops are provided on either side of the boom. Use them as stops to return the saw boom to a previous angle. Be sure to move the memory stops out of the way when rotating the saw boom.When transporting table, loosen locking knob and lift saw boom from pivot stub. Slide top decks and extensions toward center and lock with thumbscrews. Be careful not to place items on top of table or boom or bang into them as damage can/will occur. |
 |